Need to scan a receipt, contract, school assignment, or important paperwork? You don’t need a separate scanner or paid application. Your iPhone 18 has built-in tools that can turn paper documents into digital files using its camera.
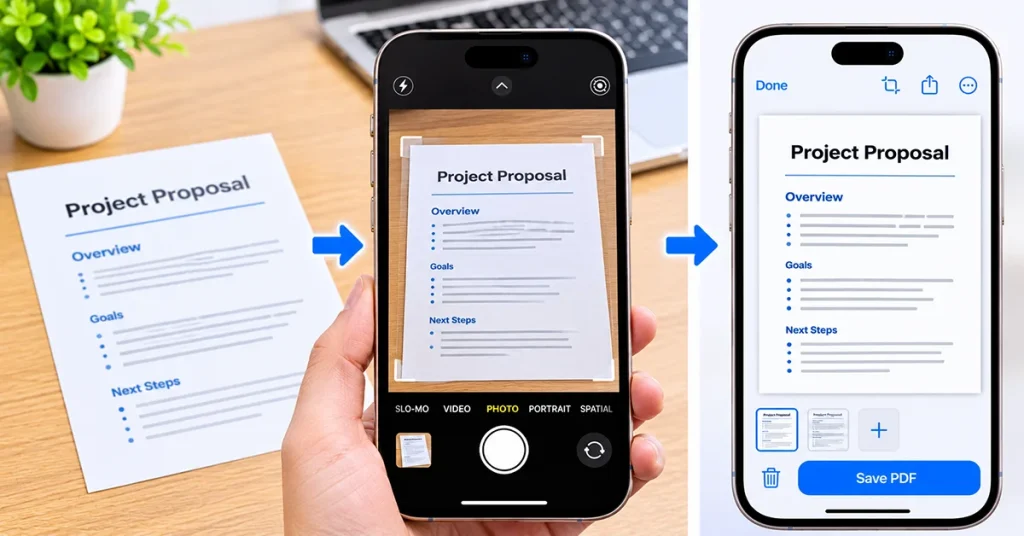
The easiest way to scan documents on iPhone 18 is through the Apple Notes app. Open a note, tap the attachment button, select Scan Documents, and point your camera at the paper. Your iPhone automatically captures the page, corrects its edges, and saves the scan as a PDF.
You can also scan documents directly into the Files app, create multi-page PDFs, sign scanned documents, and share them through email or messaging apps. Here’s how to do it.
1. How to Scan Documents on iPhone 18 Using Notes

The Notes app is the easiest option for scanning everyday documents. It works well for receipts, invoices, printed forms, and handwritten notes.
Follow these steps:
- Open the Notes app on your iPhone 18.
- Create a new note or open an existing one.
- Tap the Attachment (paperclip) button.
- Select Scan Documents.
- Place your document on a flat surface.
- Position your iPhone camera over the entire page.
- Wait for automatic capture, or tap the shutter button to scan manually.
- Adjust the page corners if necessary.
- Tap Keep Scan.
- Tap Done when you’ve finished scanning.
Your scanned document will appear inside the note as a PDF.
Tip: Use a dark, flat background when scanning white paper. This helps your iPhone detect the document’s edges more accurately.
2. How to Scan Documents Directly to Files on iPhone 18

If you want to save a scanned document as a standalone PDF instead of attaching it to a note, use the Files app.
Here’s how:
- Open the Files app.
- Navigate to the folder where you want to save your document.
- Tap the More button (three dots).
- Select Scan Documents.
- Position your iPhone 18 camera over the document.
- Allow automatic capture or switch to manual mode.
- Adjust the corners to include the entire page.
- Tap Keep Scan.
- Repeat the process if you have additional pages.
- Tap Done, choose the destination if prompted, and tap Save.
Your scanned document will be saved as a PDF in the selected location.
This method is especially useful when you need to upload a scanned document to a website, attach it to an email, or organize important paperwork in iCloud Drive.
3. How to Scan Multiple Pages Into One PDF
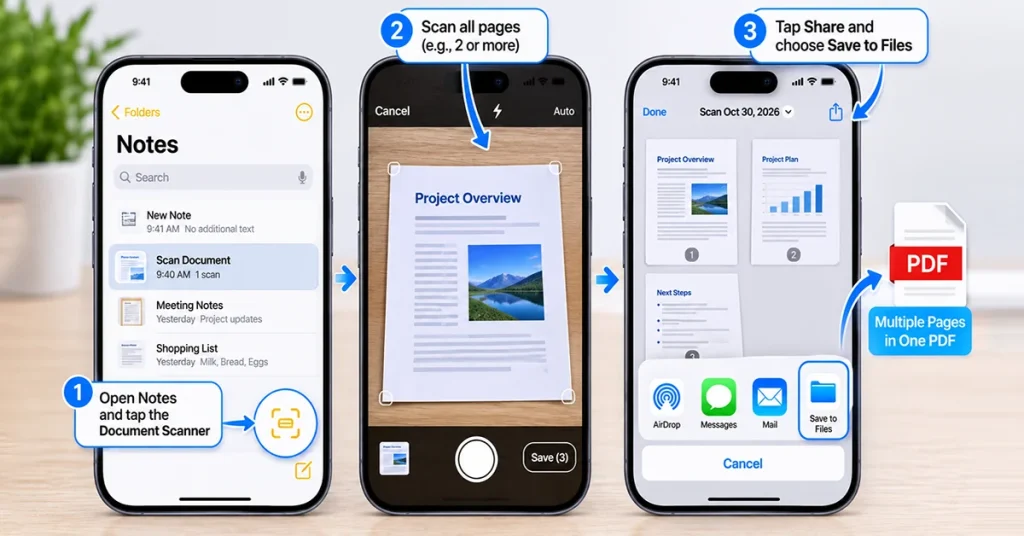
You don’t need to create a separate PDF for every page. Your iPhone 18 can scan several pages during the same scanning session and combine them into one document.
Follow these steps:
- Open Notes or Files.
- Select Scan Documents.
- Capture the first page.
- Tap Keep Scan.
- Position the next page in front of your camera.
- Continue scanning additional pages.
- Review the captured pages.
- Tap Done to finish.
Your iPhone combines the scanned pages into one PDF document.
This feature is useful for scanning contracts, school assignments, reports, receipts, and multi-page application forms.
4. How to Sign a Scanned Document on iPhone 18

You can sign scanned documents directly on your iPhone without printing them.
Here’s how to add your signature using Notes:
- Open the note containing your scanned PDF.
- Tap the scanned document.
- Tap the Markup button.
- Tap the Add (+) button.
- Select Signature.
- Create a new signature using your finger or select a saved signature.
- Adjust the signature’s size and position.
- Tap Done to save your changes.
You can also use Markup to highlight important information, write notes, or add other annotations.
Before signing sensitive documents, make sure you’re using the correct file and sending it to the intended recipient.
5. How to Share a Scanned PDF on iPhone 18

After scanning a document, you can easily send it to someone through Mail, Messages, AirDrop, or another compatible application.
To share a scanned document:
- Open Notes or Files.
- Find the scanned PDF.
- Open the document or select its options.
- Tap the Share button.
- Choose Mail, Messages, AirDrop, or another available app.
- Select the recipient.
- Send the document.
If you need to upload the PDF to a website, saving it in the Files app first can make it easier to locate.
Notes vs. Files vs. Preview: Which Scanner Should You Use?
Your iPhone offers several built-in options for scanning and managing documents. The best choice depends on where you want to store the finished PDF.
| App | Best for | Main advantage |
|---|---|---|
| Notes | Everyday paperwork | Keeps scans with your notes |
| Files | Saving and organizing PDFs | Saves directly into folders |
| Preview | PDF management | Provides additional PDF tools |
If you simply want to scan a document quickly, Notes is a great choice. Use Files when you need a standalone PDF, and Preview when you want to work with PDF documents in one place. Preview availability and features depend on your installed iOS version.
Tips for Getting Better Document Scans
Although the iPhone 18 camera can capture detailed documents, a few simple adjustments can improve your results.
- Use good lighting: Scan in a well-lit room to avoid dark or uneven pages.
- Keep your iPhone steady: Hold the phone directly above the document.
- Use a flat surface: Avoid scanning paper with folds or wrinkles.
- Check the page edges: Adjust the corners before accepting each scan.
- Clean your camera lens: Remove fingerprints and dust before scanning.
- Choose the right filter: Use color for photographs and graphics, or grayscale and black-and-white for ordinary paperwork.
- Review every page: Check that text, signatures, and important details are readable before sharing.
How to Fix iPhone 18 Document Scanning Problems
Sometimes your iPhone may not detect a document correctly, produce a blurry scan, or save the finished PDF. Try these solutions:
| Problem | Possible solution |
|---|---|
| Scan Documents option missing | Update iOS and check that you’re using Notes or Files |
| Camera won’t detect paper | Improve lighting and use a contrasting background |
| Document looks blurry | Clean the camera lens and hold your phone steady |
| Page edges are incorrect | Adjust the corner markers manually |
| Automatic scanning doesn’t work | Switch to manual capture |
| PDF won’t save | Check available storage and try another Files folder |
| Scanned pages are missing | Review the PDF before tapping Done |
If scanning still doesn’t work, close and reopen the app, restart your iPhone 18, and install any available iOS updates.
Final Thoughts
Scanning documents on iPhone 18 is simple because you don’t need a separate scanner application. The Notes app is ideal for quick scans, while Files is better for saving standalone PDFs in organized folders. You can also combine multiple pages, sign documents, and share your scans directly from your device.
For most people, Notes and Files provide everything needed to scan everyday paperwork on iPhone 18 without paying for an additional scanning app.
